Appearance
Google Workspace via Okta
Use this arrangement when Okta is your organisation's identity provider and Google Workspace sits behind it. People continue to sign in with their Google credentials, but Okta is the provider Open Archiver connects to.
browser ──► Open Archiver ──OIDC/SAML──► Okta ──► Google WorkspaceBesides matching an existing Okta deployment, this route provides something a direct Google connection cannot: group membership over OpenID Connect. Google publishes no groups in its OpenID Connect tokens; Okta does. Directory groups can therefore determine Open Archiver roles without moving to SAML.
Okta identifies people by their Okta profile, not by their Google account
Whichever provider sits behind Okta, the address Open Archiver receives is the one on the Okta user profile. If your Okta users have profile addresses at example.com, that is the domain to enter under Allowed email domains — not your Google Workspace domain, if the two differ.
This is the most common cause of a refused sign-in on a brokered connection, and it also means a single Okta connection covers every provider behind Okta. Configuring one Open Archiver connection per upstream provider is unnecessary and will not behave as expected, because all of them resolve to the same Okta user.
Before you begin
| Requirement | Detail |
|---|---|
| License | Open Archiver Enterprise with the SSO feature enabled |
| Open Archiver role | Super Admin — single sign-on is configured under Admin → Single Sign-On |
| Okta rights | Administrator access to your Okta organisation |
| Google rights | A Google Cloud project, only if Okta is not yet federated to Google Workspace |
| Application address | APP_URL must be set to the address people use to reach Open Archiver. Every address exchanged with Okta derives from it. |
Open Admin → Single Sign-On and start a new connection before configuring Okta. The form displays the exact addresses to register; copy them from the page rather than retyping them.
| Address | Used by | Example |
|---|---|---|
| Redirect URI | OpenID Connect | https://archive.example.com/signin/sso/callback |
| Service provider metadata URL | SAML 2.0 | https://archive.example.com/api/v1/enterprise/sso/saml/metadata |
| Assertion consumer service (ACS) URL | SAML 2.0 | https://archive.example.com/signin/sso/callback/saml |
Throughout this document, archive.example.com stands for your own Open Archiver address and your-org.okta.com for your own Okta organisation.
Part 1 — Federate Okta to Google Workspace
Skip this part if Okta is already federated to Google Workspace, or if your people authenticate against Okta directly.
In the Google Cloud console, create an OAuth client under APIs & Services → Credentials → Create credentials → OAuth client ID:
Field Value Application type Web application Authorised redirect URIs https://your-org.okta.com/oauth2/v1/authorize/callbackThe redirect address points at Okta, not at Open Archiver. Use your Okta custom domain instead if you have configured one.
In the Okta Admin Console, go to Security → Identity Providers → Add identity provider → Google and enter the client ID and secret from step 1.
Go to Security → Identity Providers → Routing Rules and add a rule directing the relevant users to the Google provider. Without a routing rule the Google option never appears on the Okta sign-in page, even though the federation itself is correct.
Confirm this works before continuing: open your Okta sign-in page in a private window and complete a Google sign-in.
OpenID Connect
Part 2 — Create the application in Okta
Go to Applications → Applications → Create App Integration, select OIDC - OpenID Connect and Web Application.
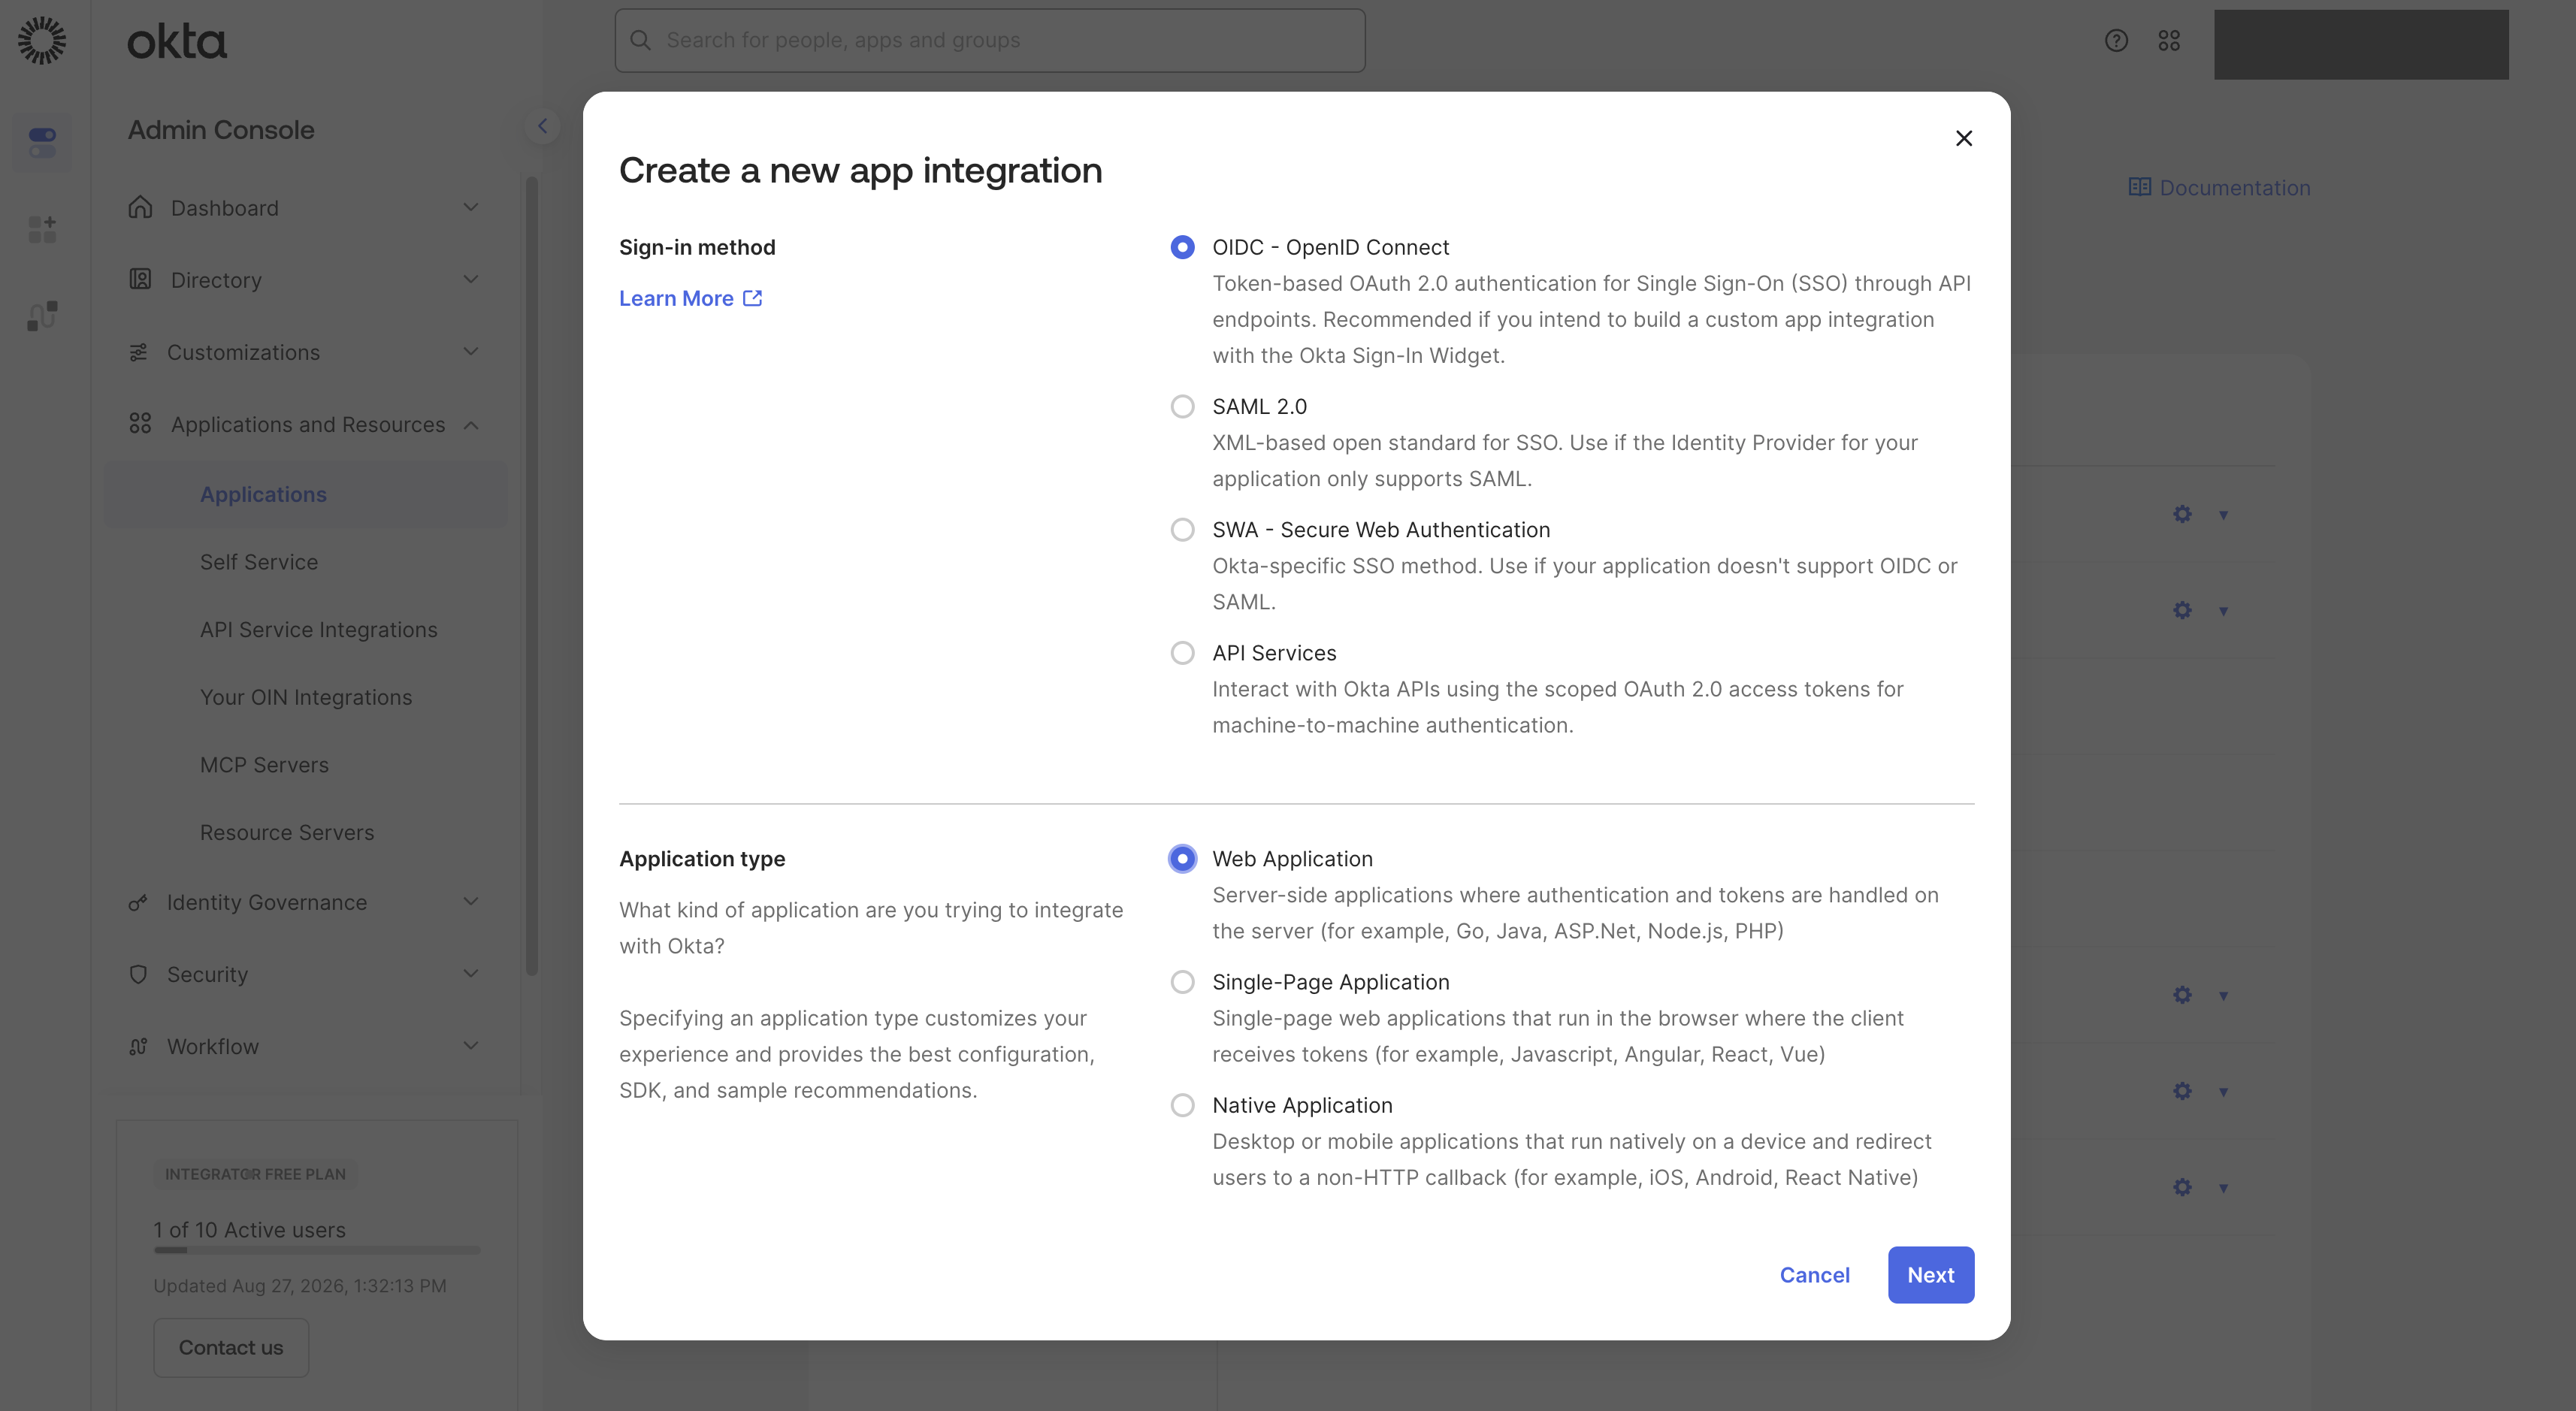
| Field | Value |
|---|---|
| App integration name | For example, Open Archiver |
| Grant type | Authorization Code |
| Sign-in redirect URI | https://archive.example.com/signin/sso/callback |
| Sign-out redirect URI | Leave blank |
Copy the Client ID and Client secret from the application's General tab.
About assignments. New OpenID Connect applications use Okta's Federation Broker Mode, which assigns every user in the organisation implicitly. The Assignments tab shows a notice rather than an Assign button, and access is governed by the application's sign-on policy instead. This is the expected state and needs no action. If your application instead shows a conventional assignment list, assign the people or groups who should have access — the built-in Everyone group is a convenient choice.
Part 3 — Release group membership
Okta offers two routes. Route A is recommended: it is purpose-built for groups and requires no expression syntax.
Older instructions describe a control that no longer exists
Many guides direct you to set a "Group claim type" and "Groups claim filter" on the application's Sign On tab. That control has been withdrawn from current Okta organisations, where the corresponding dialog contains only Issuer and Audience. Use one of the routes below instead.
Route A — custom authorization server
With this route the issuer becomes https://your-org.okta.com/oauth2/default.
Step 1 — Add the claim. Go to Security → API → Authorization Servers, select default, then Claims → Add Claim:
| Field | Value |
|---|---|
| Name | groups |
| Include in token type | ID Token, Always |
| Value type | Groups |
| Filter | Matches regex, .* |
| Include in | Any scope |
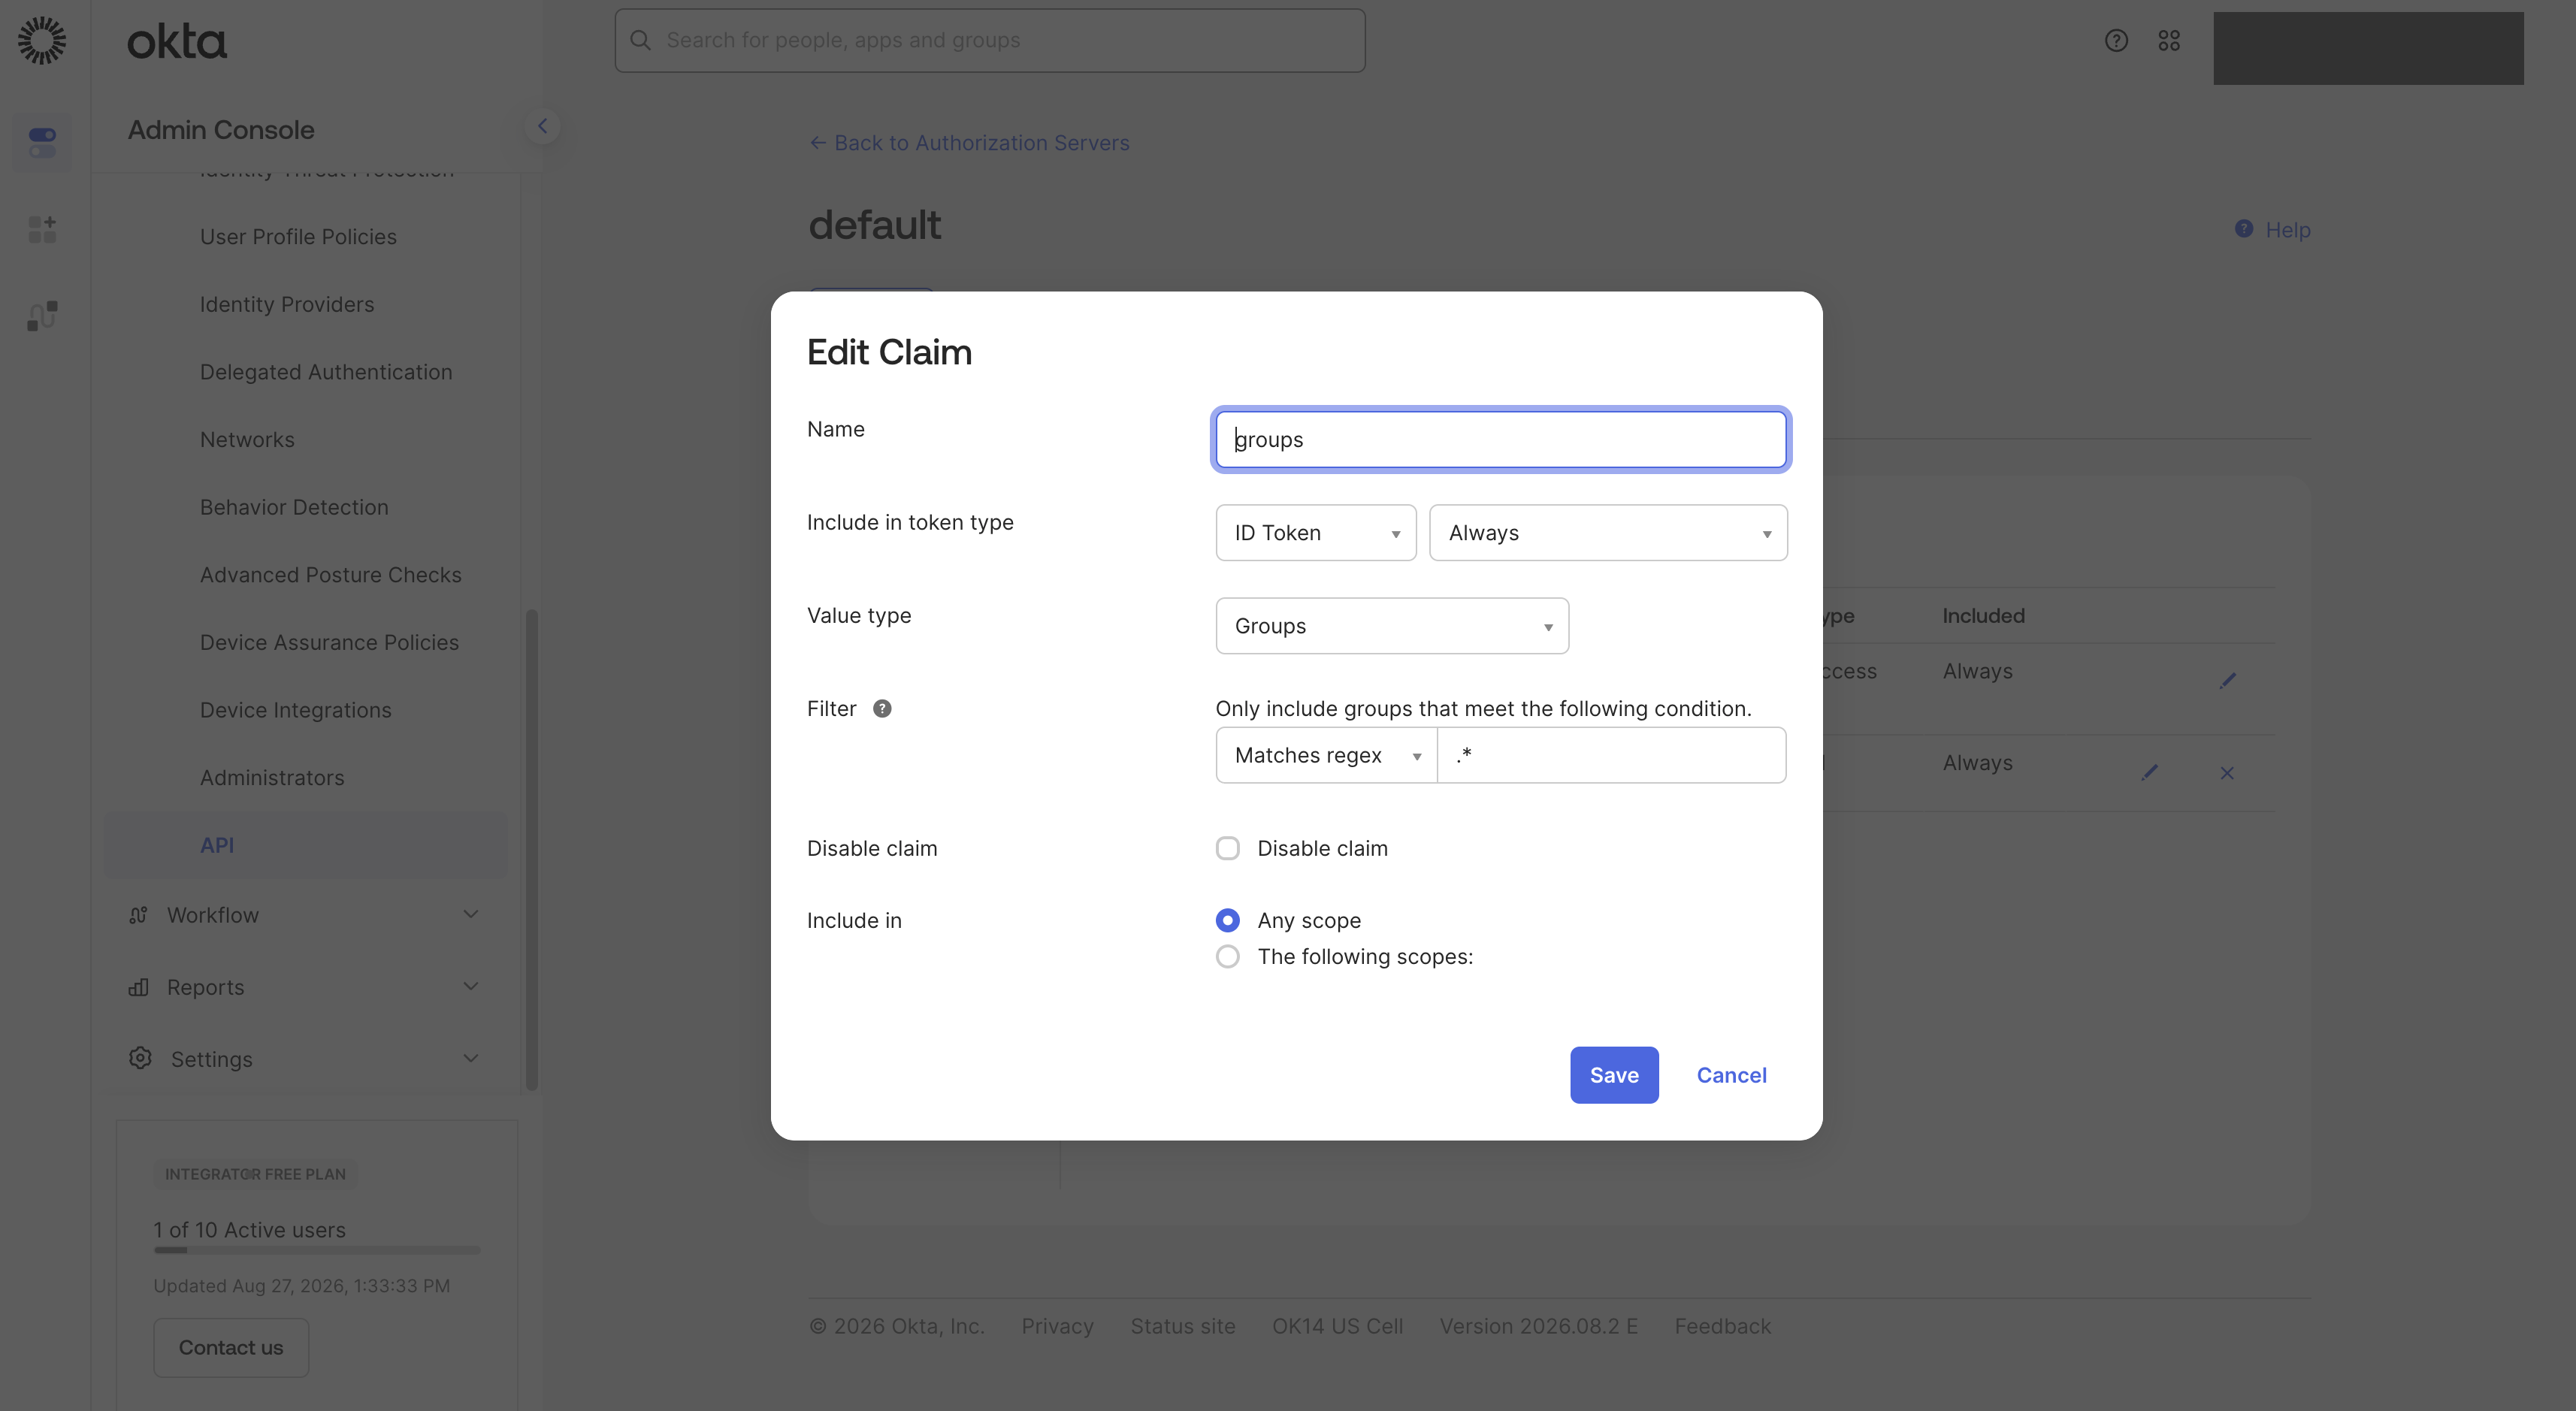
Include in: Any scope matters. Open Archiver requests a fixed set of scopes and does not request a groups scope, so a claim restricted to one would never be released.
Step 2 — Add an access policy and a rule. On the same authorization server, open Access Policies.
Some Okta organisations provide the default authorization server without an access policy. Where none exists, sign-in fails at Okta before the browser returns to Open Archiver, and no entry appears in the Open Archiver audit log because the request never arrives.
The two objects do different jobs, and both are required:
- A policy is a container. Its only decision is which applications it applies to.
- The rules inside it are what actually permit a sign-in. They are evaluated in order, and the first match applies.
A newly created policy contains no rules and therefore permits nothing. Select Add Policy, assign it to All clients or to this application, then Add Rule inside it. The template defaults are usually correct; confirm these:
| Field | Value |
|---|---|
| IF Grant type is | Authorization Code, under Client acting on behalf of a user |
| AND User is | Any user assigned the app — under Federation Broker Mode this means everyone |
| AND Scopes requested | Any scopes |
| THEN | Token lifetimes — defaults are appropriate |
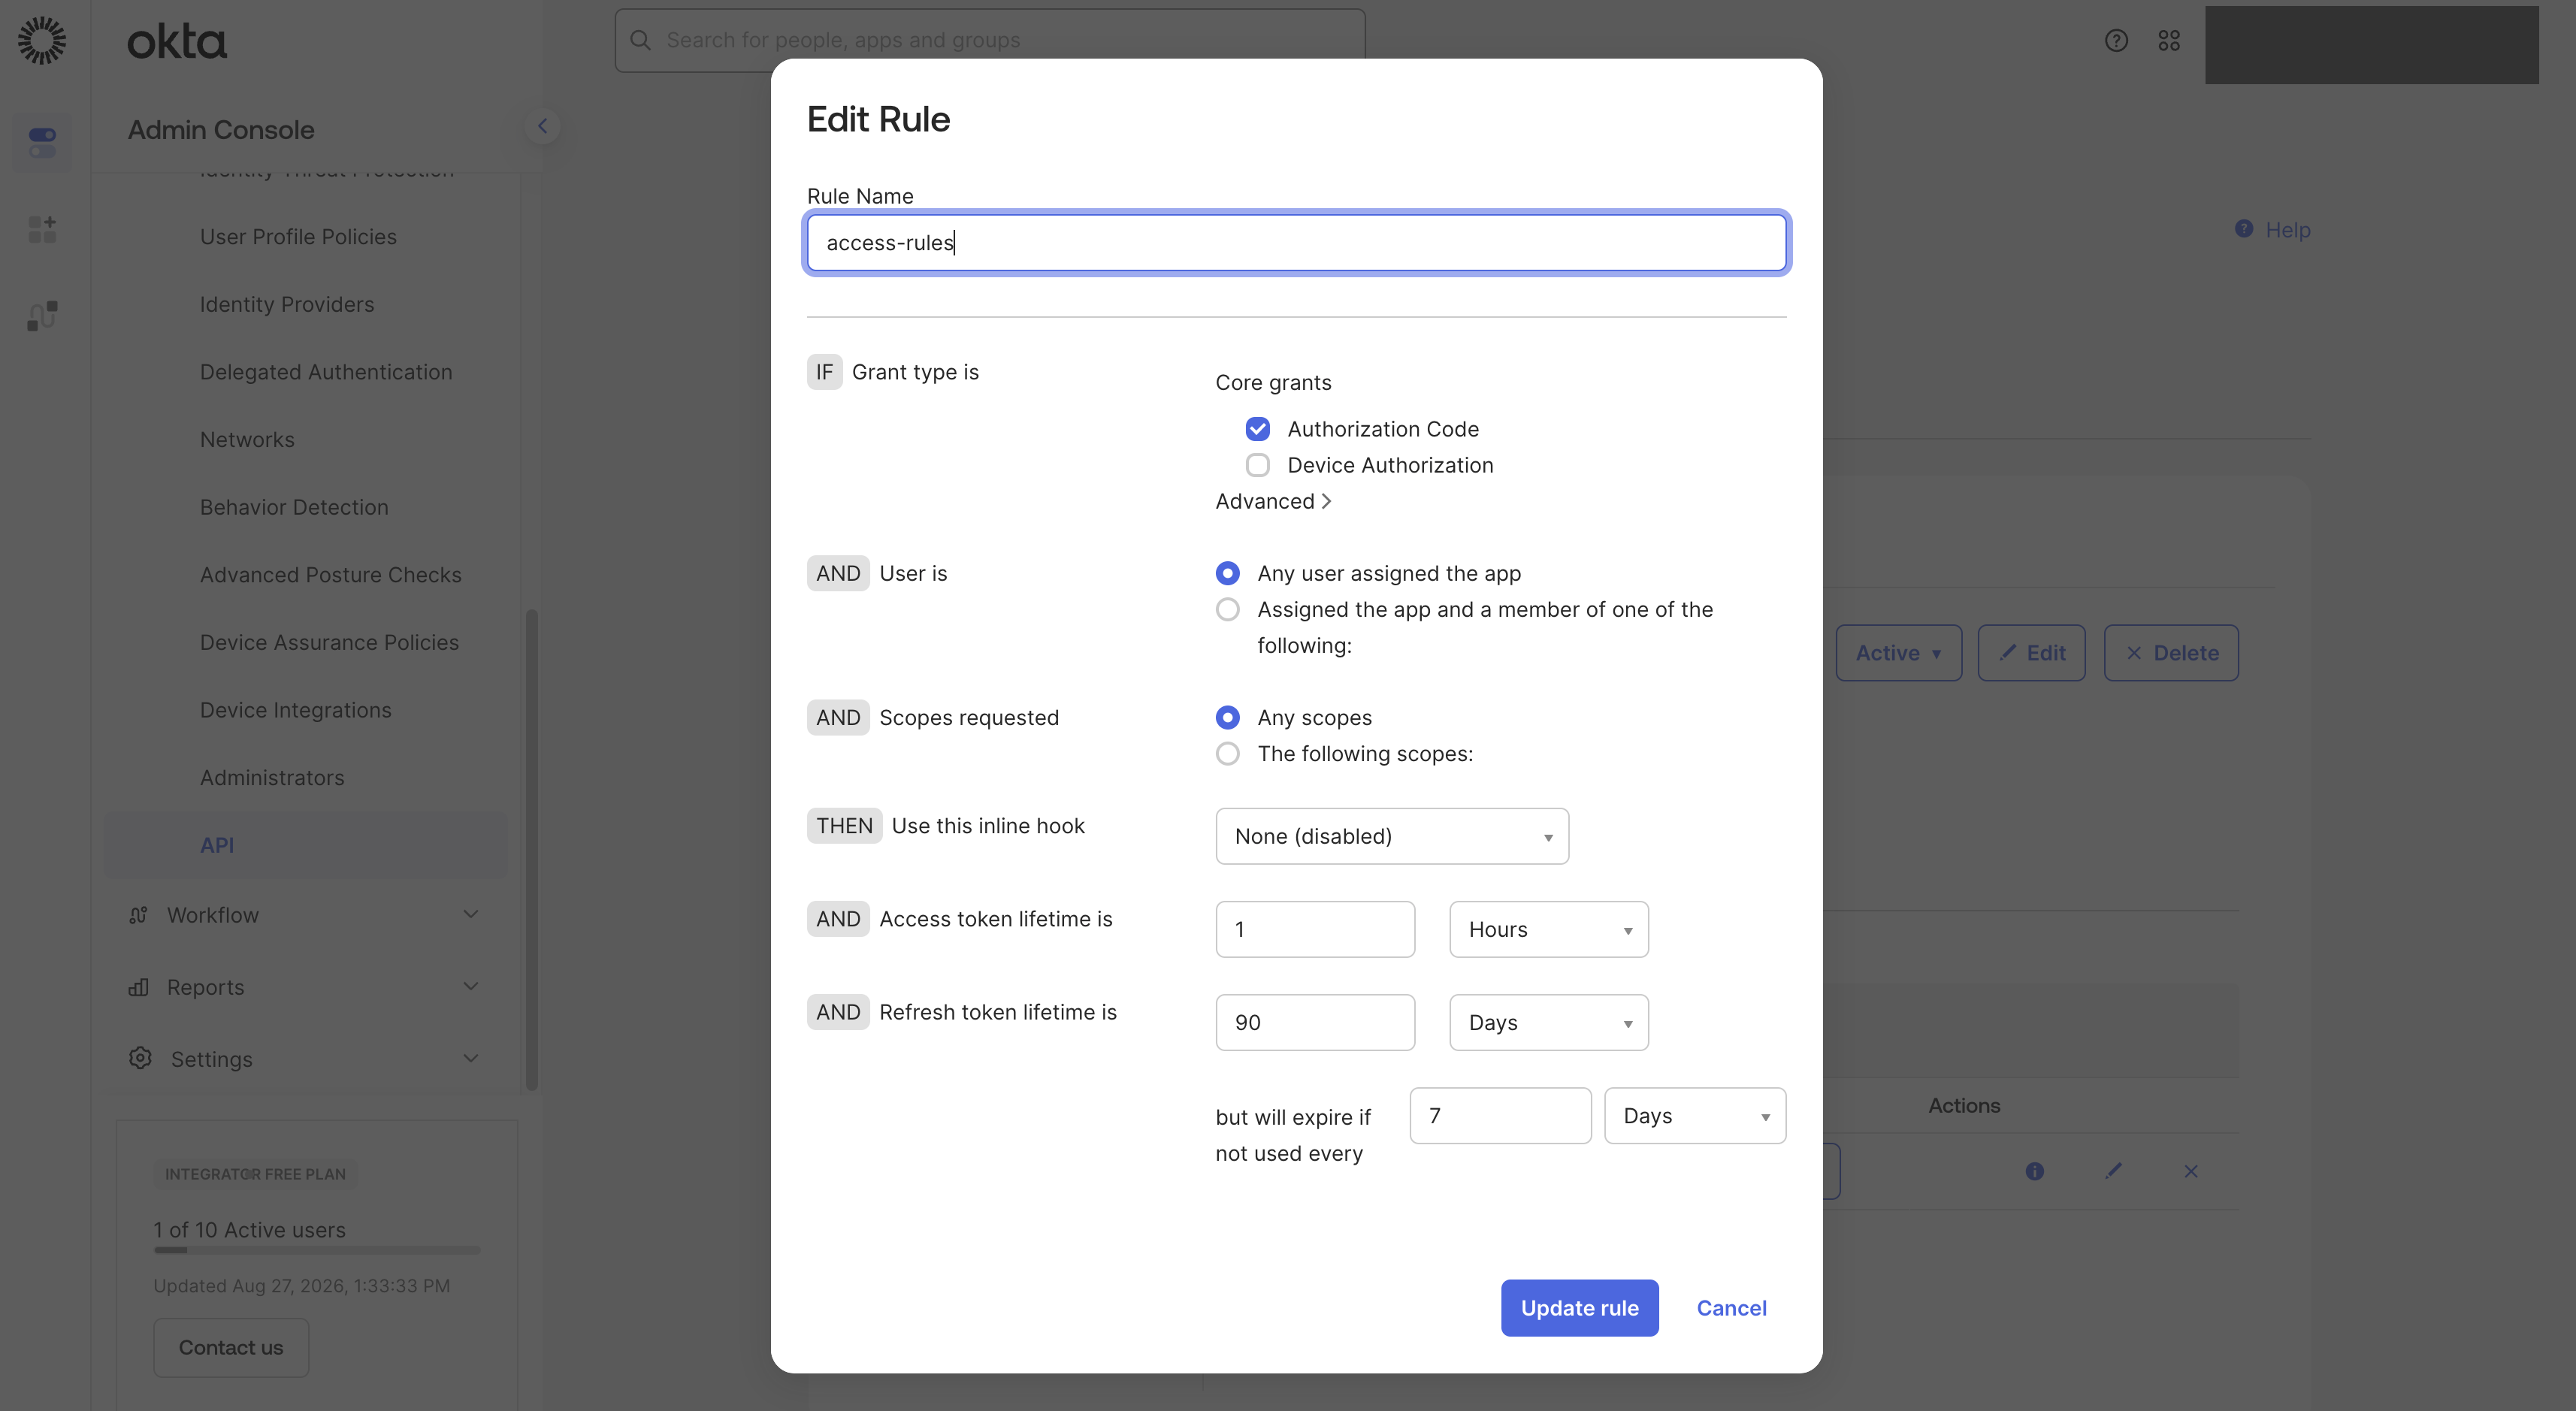
When this is correct, the Access Policies tab shows one policy containing one rule, with your application in its assignment list.
Route B — federated claims
With this route the issuer stays https://your-org.okta.com, and no access policy is required.
On the application's Sign On tab, in the Token claims section, select Add expression:
| Field | Value |
|---|---|
| Name | groups |
| Value | user.getGroups({'group.profile.name': '.*'}) |
| Include in | The ID token |
The value is an Okta Expression Language expression. Adjust the pattern to narrow which groups are released.
Part 4 — Create the groups to map
Under Directory → Groups, create the groups that should correspond to Open Archiver roles — for example archive-admins and archive-auditors — and add the relevant people to them.
Okta also provides a built-in Everyone group containing every user, which is a convenient baseline mapping.
Part 5 — Create the connection in Open Archiver
Identity provider
| Field | Value |
|---|---|
| Protocol | OpenID Connect |
| Display name | Okta — appears on the sign-in page as "Continue with Okta" |
| Issuer URL | https://your-org.okta.com/oauth2/default for Route A, or https://your-org.okta.com for Route B |
| Client ID | From Part 2 |
| Client secret | From Part 2 |
Accounts
| Field | Value |
|---|---|
| Allowed email domains | The domain of your Okta profile addresses — see the note at the top of this page |
| Create accounts on first sign-in | On, so people receive an account the first time they sign in |
| Link to existing accounts | On, so a person who already has an Open Archiver account keeps it |
Roles
| Field | Value |
|---|---|
| Groups claim | groups |
| Group mappings | The Okta group name on the left, the Open Archiver role on the right |
| Default role | Recommended, as the fallback for anyone matching no mapping |
| Update roles on every sign-in | On, so moving a person between Okta groups updates their role |
Okta identifies groups by name
Enter archive-admins, not an email address — this differs from a direct Google SAML connection, which identifies groups by address. Matching is exact and case-sensitive: a group named Everyone is not matched by a mapping written as everyone.
Part 6 — Test, then enable
- Select Test connection. A successful test confirms Open Archiver can reach Okta and read its configuration.
- Turn on Enable this connection.
- Save.
SAML 2.0
Part 2 — Create the application in Okta
Go to Applications → Applications → Create App Integration and select SAML 2.0.
Configure SAML:
| Field | Value |
|---|---|
| Single sign-on URL | https://archive.example.com/signin/sso/callback/saml |
| Audience URI (SP Entity ID) | https://archive.example.com/api/v1/enterprise/sso/saml/metadata |
| Name ID format | EmailAddress |
| Application username |
Then add a Group Attribute Statement:
| Name | Filter |
|---|---|
groups | Matches regex, .* |
Finish the wizard. From the application's Sign On tab, copy the Identity Provider metadata address — it takes the form https://your-org.okta.com/app/<app-id>/sso/saml/metadata.
Finally, open the Assignments tab and assign the people or groups who should have access. SAML applications use conventional assignments, so this step is required even when your OpenID Connect application did not need it.
Part 3 — Create the connection in Open Archiver
Identity provider
| Field | Value |
|---|---|
| Protocol | SAML 2.0 |
| Display name | Okta |
| IdP metadata URL | The Identity Provider metadata address from Part 2 |
| IdP metadata XML | Leave empty. Okta's metadata address is reachable and keeps certificate changes current automatically. |
Accounts and Roles — as for OpenID Connect above, with Groups claim set to groups.
Part 4 — Test, then enable
As for OpenID Connect. A successful SAML test reports the sign-in address and the number of signing certificates found in the metadata.
Verify the first sign-in
Sign in from a private browser window, so existing Okta and Google sessions do not mask the flow.
- Open the Open Archiver sign-in page and select Continue with Okta.
- On the Okta sign-in page, choose Sign in with Google and authenticate with your Google account.
- Confirm you arrive at the dashboard.
Then check the following as an administrator:
| Where | What to confirm |
|---|---|
| Settings → Users | The account exists, with the role its Okta group grants rather than the default role |
| Compliance → Audit Log | An account-creation entry for a first sign-in, and a sign-in entry for every one |
| Settings → Account (as that user) | Password management is hidden for accounts created through single sign-on |
To confirm group mapping is live, move the test user to a different Okta group and sign in again. The role should follow at the next sign-in.
Troubleshooting
Two federation steps make diagnosis harder. Check Okta's Reports → System Log first: it shows whether a failure occurred between Okta and Google, or between Open Archiver and Okta. Only then consult the Open Archiver audit log.
Failed sign-ins show the same brief message to the person signing in. The explanation is recorded in Compliance → Audit Log, where each failed sign-in entry names the connection, the address the provider supplied, and the domains the connection permits.
| Symptom | Cause | Resolution |
|---|---|---|
| Sign-in fails; audit log reports a domain that is not allowed | The address is the Okta profile address, whose domain differs from the one configured | Add the domain shown in the audit entry — see the note at the top of this page |
| Sign-in fails at Okta; nothing appears in the Open Archiver audit log | The request never reached Open Archiver, usually a missing access policy rule (Route A, Step 2) | Add a policy and a rule on the default authorization server |
| Sign-in succeeds but the role is the default, not the mapped one | The groups claim is absent or the group names do not match | Confirm the claim configuration in Part 3, then compare group names against Group mappings |
| The Google option never appears on Okta's sign-in page | No routing rule directs users to the Google provider | Add a routing rule under Security → Identity Providers → Routing Rules |
| Okta reports the user is not assigned | The person is not assigned to the application (SAML, or an application without Federation Broker Mode) | Assign them, or the group they belong to, on the application's Assignments tab |
| No sign-in button appears | The connection is not enabled, or the license does not include SSO | Enable the connection; confirm the license under Admin → License |
Reference
- One connection covers every upstream provider. Because Okta brokers the sign-in, a single Open Archiver connection serves everyone Okta authenticates, whichever provider sits behind it. Add further providers inside Okta, not as additional Open Archiver connections.
- Group matching is exact and case-sensitive, and Okta identifies groups by name.
- The
Everyonegroup is present for every user, so with a match-everything filter each person always carries at least one group. - Signing out. Signing out of Open Archiver ends neither the Okta nor the Google session. Use a private window when testing repeatedly.
For the roles model, running several providers at once, and requiring single sign-on, see the SSO guide.